2.8 Set up the MyID Entrust Certificate Authority
Note: If you want to set up more than one Entrust CA within MyID, you may experience problems. For more information, contact customer support, quoting reference SUP-171.
To edit a Certificate Authority (CA):
- From the Configuration category, select Certificate Authorities.
-
The Certificate Authorities workflow is displayed, with the Select a CA stage highlighted.
-
If an Entrust JASTK CA already exists, select it from the list and click Edit.
-
If an Entrust JASTKCA does not already exist, click New.
-
-
From the CA Type drop-down list, select Entrust JASTK.
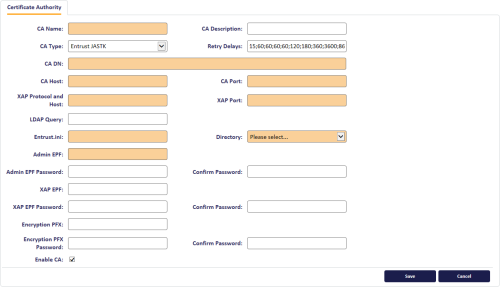
Note: All of the fields with a colored background in the example are mandatory.
-
Set the following fields:
-
CA Name – Enter the name that you will use to identify the CA.
-
CA Description – Enter a description for the CA.
-
CA Type – Select Entrust JASTK.
-
Retry Delays – A semi-colon separated list of elapsed times, in seconds.
-
If the first attempt to retrieve details from the CA fails, a second attempt will be made after a 5 second delay.
-
If this second attempt fails, the CA will be contacted again after 10 seconds.
-
Subsequent attempts will be made to retrieve information every 20 seconds, until a response is received.
If you want to limit the number of retry attempts, enter 0 as the last number in the sequence.
-
-
CA DN – Enter the DN (distinguished name) of the CA.
You can obtain this value from the CA Distinguished Name item in the [Entrust Settings] section of the entrust.ini file.
- CA Host – Enter the DNS name or IP address of the Entrust server.
-
CA Port – Enter the IP Port of the Entrust server. The default port number is 829.
The CA Host and CA Port values must match the settings for Authority in the [Entrust Settings] section of the entrust.ini file; for example:
[Entrust Settings]
Authority=myserver.example.com+829
-
XAP Protocol and Host – Enter the address of the XAP host, including the protocol; for example:
https://myserver.example.com
-
XAP Port – Enter the port for the XP host. The default port number is 443.
The XAP Protocol and Host and XAP Port values must match the settings in the [XAP Information] section of the entrust.ini file; for example:
[XAP Information]
XAP=myserver.example.com+443
Note: The entrust.ini file does not contain the protocol (http or https) but you must include it in the XAP Protocol and Host field.
-
LDAP Query – Enter the query that MyID uses to find the Entrust LDAP entity.
See section 3.1, Setting the LDAP query string for details.
-
Entrust.ini – Enter the fully qualified path to the entrust.ini file.
Important: Do not use Windows-style back slashes (\) in the path. Use UNIX-style forward slashes (/).
- Directory – Select the LDAP directory being used from the list available.
-
Admin EPF – See section 2.8.1, Admin EPF for details.
Important: Do not use Windows-style back slashes (\) in the path. Use UNIX-style forward slashes (/).
-
Admin EPF Password – Enter the password for the Admin EPF file.
-
XAP EPF – Enter the full file path to the XAP epf file you created in section 2.4, Create the MyID server profiles.
Important: Do not use Windows-style back slashes (\) in the path. Use UNIX-style forward slashes (/).
The XAP EPF settings are optional; they may be required if the Admin EPF does not have the required credentials. See section 2.8.2, XAP EPF.
-
XAP EPF Password – Type and confirm the password for the XAP epf file.
-
Encryption PFX – Enter the fully qualified path to the encryption certificate file. This can be a PFX or P12 file.
important: Do not use Windows-style back slashes (\) in the path. Use UNIX-style forward slashes (/).
Note: This encryption certificate is required only if you are going to be issuing archive certificates from your Entrust CA. If you do not want to issue archive certificates, you can leave this field blank.
-
Encryption PFX Password – Enter the password used in conjunction with the encryption certificate file.
The password is the same as the password associated with the EPF profile file that you used to generate the certificate file.
- Select Enable CA to make the policies available for issue.
-
- Click Save to save these setting to the database.

Note: Changes made do not take effect immediately, as the normal interval for MyID to poll for updates is 50 minutes. To force MyID to poll for changes immediately, you must manually restart the eKeyServer service, then restart the eCertificate service.
MyID is now ready to issue certificates.
2.8.1 Admin EPF
The Admin EPF can either be the full file path to the epf file created in section 2.4, Create the MyID server profiles, or a compound value representing the P11 library for your HSM, the slot serial number where the hardware based credential was created, and the name of that profile.
Note: The credential must be created with the Admin Services User Management certificate type.
Depending on what tools were used to create the hardware based credential, one or more files will have been created. You must copy those files to the MyID application server to a location with the same path as they were original generated.
Note: Contact Entrust for guidance on the appropriate tools for creating the hardware based credential; currently, Entrust suggest the PCU administration services utility.
An epf file can be copied anywhere – when it is a hardware based credential the copies of the files on the application server must match the location on the CA where they were created.
For example:
A hardware based credential was created into c:\authdata\manager\epf for a user HSM Officer. The profile for ‘HSM Officer’ was created (without a space) as HSMOfficer.
The files created, which will include one of more of .apf/.arl/.cch/.crl/.pch/.xcc must be copied to:
C:\authdata\manager\epf
on the MyID application server.
Within MyID, assuming your P11 DLL from your provider is cryptoki.dll, the Admin EPF value recorded in MyID would be:
<path to p11 dll>/SerialNumber|<ProfileName>.tkn
Note: There is no actual .tkn file at the location – the .tkn suffix is used to specify the name of the profile, not a filename.
Important: Do not use Windows-style back slashes (\) in the path. Use UNIX-style forward slashes (/).
C:/Windows/System32/cryptoki.dll/123456789|HSMOfficer.tkn
Or if it is on the system path:
cryptoki.dll/123456789|HSMOfficer.tkn
Or if at the point of installation:
C:/Program Files/SafeNet/LunaClient/cryptoki.dll/123456789|HSMOfficer.tkn
Note: While you can use an HSM credential for both a system using the Entrust Administration Toolkit for C and JASTK, they must have their own HSM/slot/partition.
2.8.2 XAP EPF
MyID requires access to the Entrust XAP web service, and this service has specific requirements; see your Entrust documentation for details. You can either extend the Entrust security officer profile to have the required permissions, or use a separate XAP profile that has the required permissions.
If you do not specify a XAP EPF, MyID uses the Admin EPF to attempt to connect to the XAP service. If you specify a XAP EPF, MyID uses this XAP profile to connect to the XAP service.
If you are using HSM backed credentials, the XAP EPF has the same requirements as the Admin EPF described above.